
Worked example: Epson Perfection V600 Photo using the legacy Epson Scan Professional Mode described in Epson’s published guide. Menus, drivers and compatibility can differ on current computers. Follow the guide supplied for your exact model and installed software.
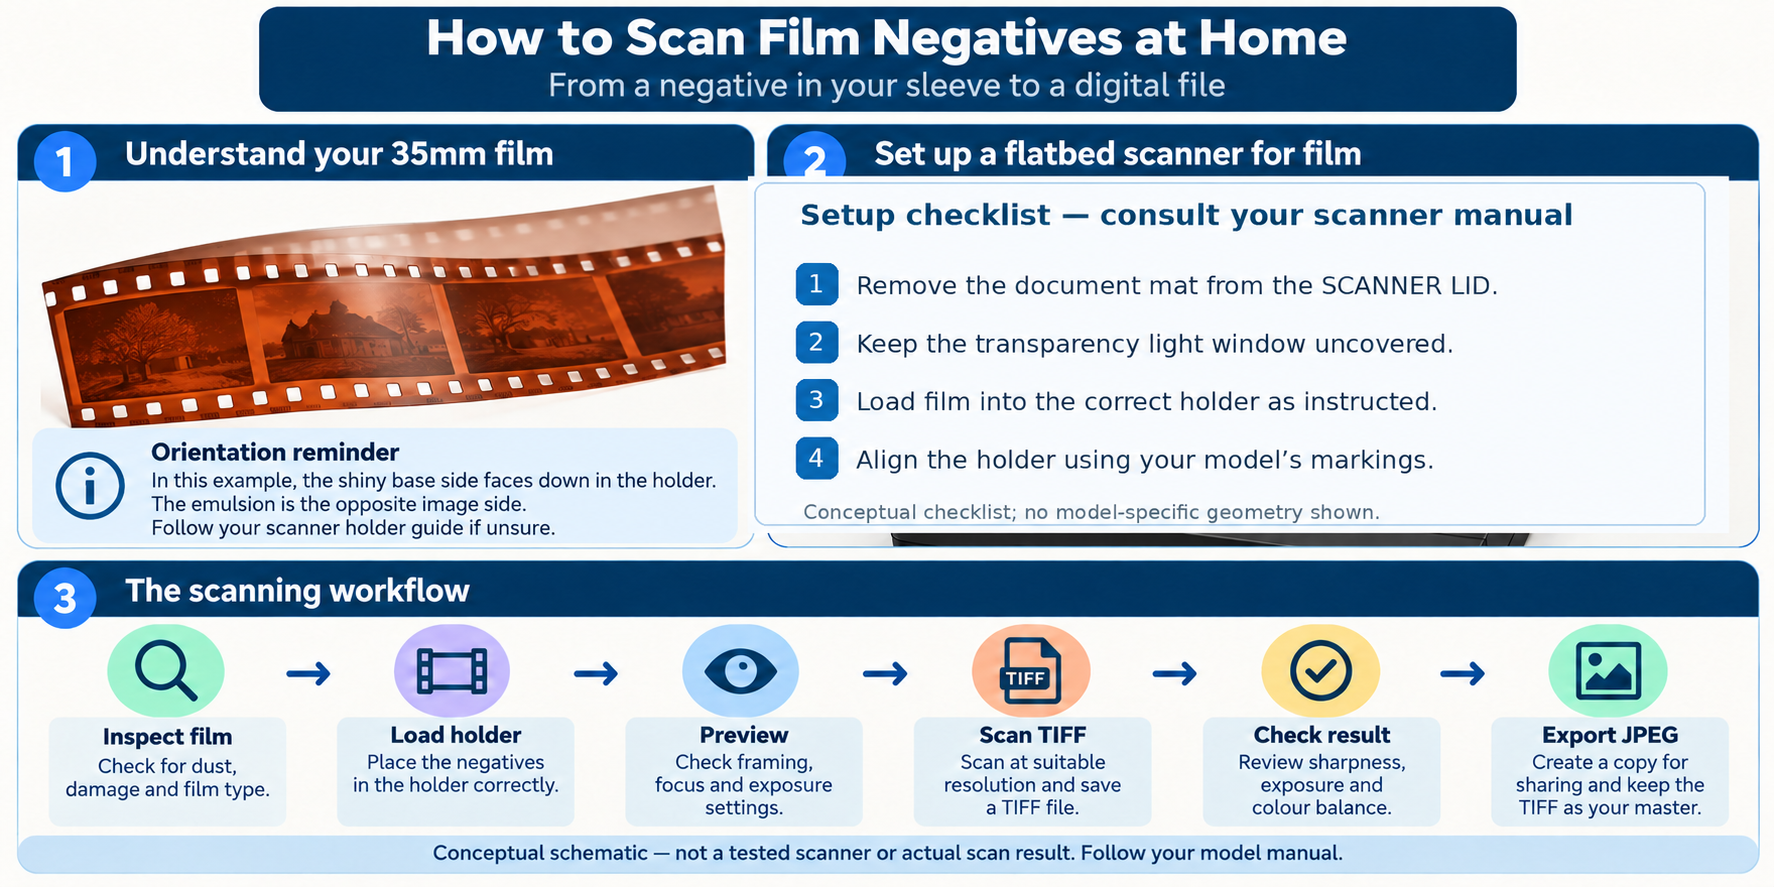
You can turn developed film negatives into digital photographs at home, but a good scan requires more than placing film on glass. You need to identify the film, protect it from damage, load it correctly, choose suitable capture settings, verify the digital file and correct problems without losing detail. This guide walks through an Epson-documented capture and verification procedure using one bounded example; negative-to-positive conversion and modern software compatibility need the checks noted below. If you own another scanner—or prefer a camera, phone kit or photo lab—use the method selector first, then follow that equipment’s instructions. For a comparison of capture formats before choosing equipment, see film vs digital photography.
What you will finish with: a properly oriented TIFF master and a checked positive-image JPEG to share. If your first saved scan is still a negative, follow the conversion route in Step 10 before exporting. This is a documentation-based tutorial, not a claimed hands-on equipment test.
In this guide — show sections
Choose the right scanning method
Table 1: Choosing a scanning method — swipe or scroll sideways to view every column.
Decision example: If you have six strips of 35mm color negatives and an Epson V600, follow the worked example below. If you have only a normal document scanner, check whether it actually includes a transparency light source before buying film holders.
Before you begin, check:
- Your negatives are developed and dry, not an unprocessed film roll. If you are unsure about unloading an exposed roll, see how to load and rewind 35mm film before opening it.
- Your scanner supports transmitted-light film scanning and you have the correct film holder.
- Your installed software supports the scanner and the film type.
Before you touch the negatives
Check the film’s condition first. Ordinary modern 35mm color negatives are different from unstable historical film. If a strip is unusually sticky, sharply curled, brittle, or smells strongly of vinegar or another pungent odor, do not force it into a holder or attempt wet cleaning. Isolate it from other material and seek conservation guidance. Edge markings such as SAFETY or NITRATE can help identification but are not, alone, conclusive. Illinois PSAP, Negatives; Library of Congress, Film Care.
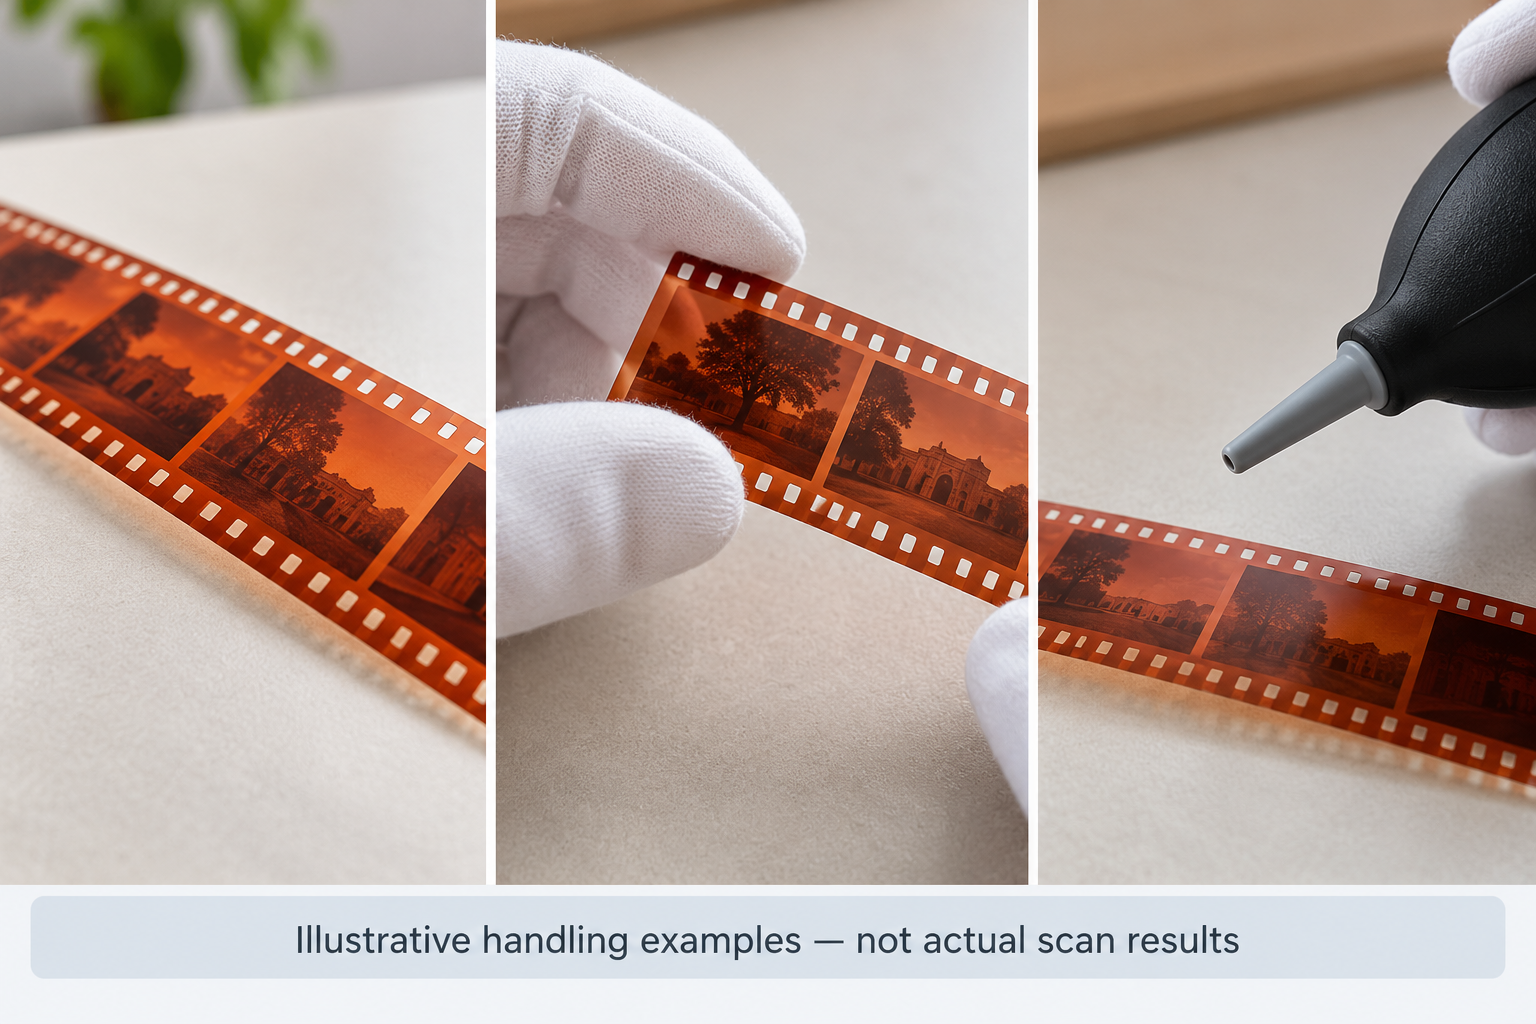
Set up a clean work area. Wash and dry your hands or use clean, well-fitting nitrile gloves; hold strips at the edges, not over image frames. Keep food, drinks, adhesive tape and sharp tools away. Blow loose dust with an air bulb—not canned air. Do not rub the film with an ordinary cloth or apply unverified liquid cleaner. Even a soft brush can scratch some photographic materials. Library of Congress, Photographs.
Know what you are holding. A color negative often has an orange-tinted film base; black-and-white negatives may look gray; transparencies/slides are already positive images. Many films have a relatively shiny base side and a duller emulsion side, but appearance alone may be ambiguous. Follow your particular scanner holder’s orientation instructions rather than a universal rule.
Stop and use conservation guidance when you notice:
- Strong vinegar or acrid odors, unusual stickiness, brittleness, or severe warping.
- Unknown historic film stock where nitrate or deteriorated acetate is suspected.
Worked example: 35mm negatives with the Epson V600 and legacy Epson Scan
This procedure is tied to Epson’s documented interface. It does not establish whether the older Epson Scan program installs on your current OS. Check the Epson support and downloads page for the exact driver available for your machine, and compare the actual menus before proceeding.
Step 1 — Prepare the scanner safely
With the device idle, open the lid and remove the white document mat to uncover the transparency window. Use a soft cloth to remove dust from the glass and transparency window; for deeper cleaning follow Epson’s power-off/unplugged cleaning instructions, not improvised solvents or sprays. Expected: the film backlight window is uncovered and the scanning surfaces are clean. If not: stop and consult the correct hardware guide; do not press or scrape glass. Epson film placement; Epson cleaning.
Step 2 — Load the strip into the holder
Open the 35mm film strip holder, slide one or two strips into the slots with the shiny base side facing down, and leave the image areas flat. In this documented orientation, pictures and edge lettering appear backwards when viewed from the side facing up. Avoid touching image surfaces. Keep the small holes and white recognition stickers unobstructed; press the holder cover and its edges closed until secured. Expected: the strip sits flat without being pinched, with every holder identifier visible. If not: reopen and reposition gently; never force a warped strip into place. Epson V600 film holder.
Step 3 — Place the holder and close the scanner
Align tab A on the holder with area A on the scanner glass, as shown in Epson’s actual manual. Lower the cover. Expected: the holder sits in its designed position; nothing obstructs the transparency window. If not: check orientation against Epson’s drawing before scanning. This alignment is specific to this holder; do not transfer it to another Epson model.
Step 4 — Open the correct software mode
Start Epson Scan and select Professional Mode. Set Document Type → Film. Set Film Type → Color Negative Film for color negative strips or B&W Negative Film for black-and-white negatives. Do not select Positive Film just because you want a positive final photo. These exact labels apply to legacy Epson Scan Professional Mode, not necessarily Epson Scan 2. If your software only offers Epson Scan 2 or lacks these options, stop and follow the instructions for the installed version; do not force a different document/film type or assume the menu sequence is identical. Epson Professional Mode.
Step 5 — Choose image depth and a reasonable starting resolution
For a color scan that you intend to edit, select 48-bit Color if your editing software supports it. For grayscale negatives requiring tonal adjustment, Epson documents 16-bit Grayscale. These settings preserve editing latitude but may create larger files. Try 3200 ppi as a practical first setting for a standard 35mm frame (a suggested starting point, not an Epson requirement); adjust for file size, crop and actual sharpness. Choose the scan resolution based on your desired pixel size; ppi is a requested sampling setting, not a guarantee of real optical detail. Epson Professional Mode.
For the long edge of a standard 36mm frame, approximate pixel counts are:
Table 2: Resolution and print size — swipe or scroll sideways to view every column.
Calculated using 36 ÷ 25.4 × ppi; real results vary with crop and equipment. Print dimensions are mathematical examples, not quality guarantees. VueScan’s own scanning manual recommends 2400–4000 dpi for 35mm; that is vendor guidance, not a universal preservation requirement. VueScan.
Step 6 — Preview and select a complete frame
Click Preview. Inspect that the film frames appear. In Normal Preview, drag a marquee around the image, leaving enough margin that you do not accidentally crop the picture. When drawing multiple marquees, Epson instructs selecting All to scan each one, rather than only the active marquee. Expected: complete frames are selected and not tilted or truncated. If not: redraw the crop and check the holder, rather than accepting a missing edge. Epson preview settings.
Step 7 — Decide whether dust correction is appropriate
Dust correction should follow physical dust removal, not replace it:
Table 3: Dust correction compatibility — swipe or scroll sideways to view every column.
Neither correction appears in Preview; judge only the completed scan. Rescan without the filter if edges become mushy or artifacts appear. Epson Digital ICE; Epson Dust Removal.
Step 8 — Scan and save the master
Choose the destination in File Save Settings, use a descriptive prefix such as roll-2026-01, and select TIFF when additional editing is expected. Epson documents an automatically added sequential three-digit suffix. TIFF avoids repeated JPEG compression losses during editing; create a separate JPEG once you are ready to share. Expected: the TIFF exists in the selected folder and opens without corruption. If not: check the save destination, available storage and saved file format before rescanning. Epson save settings.
Step 9 — Inspect the actual result
Open the saved TIFF. Check the complete frame, orientation, detail at 100% in the center and near edges, visible dust, and whether highlights and shadows retain information. Look at the histogram: a hard pile-up against one edge can indicate clipping, but the histogram must be interpreted with the image content. Compare the scan with what is visible on the negative; an unusually saturated color cast or lost edge is a reason to review settings. This checklist helps you catch missing frame edges, clipping, dust and files that failed to save.
Step 10 — Make modest corrections, then export a sharing copy
First inspect the saved scan: if light and dark areas already look like a normal photograph, it is a positive—do not invert it again. If the image is still a negative (tones reversed and perhaps an orange mask), use the conversion route below. For a usable positive, use a free editor such as GIMP to adjust tonal levels if necessary. In GIMP 3.0, open Colors → Levels, inspect the Value histogram and adjust black, midtone and white points conservatively. You can inspect Red, Green and Blue channels individually if a color cast remains. Keep the unedited scanner TIFF and export a separate finished file, such as a JPEG, for sharing. GIMP 3.0 Levels; GIMP 3.0 Invert.
If your saved scan is still negative — finish the conversion: Preserve the untouched TIFF. First confirm that Color Negative Film (or B&W Negative Film) was selected in the scanner software, preview again and save a fresh test scan; Epson documents these film-type settings but software behavior may depend on version. If the file remains negative, use a dedicated conversion workflow such as darktable negadoctor. Open a copy of the negative image, activate negadoctor, choose color or black and white film stock, and work through the module’s film properties → corrections → print properties controls in order. For color film, sample a clean unexposed film-base border for the film-base color/D min (if not captured, use a separate image of an unexposed part of the same film stock). Follow the module guide to set D max and scan exposure bias and inspect the histogram for clipping; adjust print exposure/color only as needed. Verify that the resulting image has normal light/dark polarity and plausible colors, then export a separate JPEG. If no unexposed film-base sample is available or corrections remain unreliable, consult that workflow’s documentation rather than guess settings or claim an accurate color result. A simple GIMP Colors → Invert can reverse tones for a monochrome negative, but is not a reliable one-click color-negative/orange-mask correction. The workflow is documentation-based, not a claimed hardware test.
Step 11 — Name, back up and store safely
Keep the untouched master separate from edits. For example: roll-2026-01-frame-04-master.tif and roll-2026-01-frame-04-share.jpg. Note date, film stock if known, scanner/software, resolution, dust-tool choice and modifications in a short scan log. Keep another copy of important digital images in a separate location; periodically confirm files can be opened. Return stable negatives to appropriate photo-safe sleeves; do not place visibly deteriorating acetate or nitrate into ordinary plastic sleeves. Library of Congress photo housing.
Keep these output files separate:
- The original, unedited TIFF scan.
- An edited working copy for corrections.
- A smaller JPEG export intended for sharing.
Troubleshoot by what you actually see
Table 4: Scanning troubleshooting — swipe or scroll sideways to view every column.
The Epson-specific checks come from Epson scan problems, the holder instructions, and the dust-correction documentation. These checks are a suggested sequence; follow the scanner maker’s instructions for model-specific faults.
Before calling the scan complete:
- Inspect the complete frame and check its orientation.
- Look at image details at 100%, especially the center and edges. If defects resemble streaks from camera exposure rather than scanning, review film camera light leaks.
- Check highlights, shadows, color and dust, then reopen the exported file.
Other ways to digitize negatives
Dedicated film scanner: A scanner such as Plustek’s OpticFilm 8100 is designed for 35mm film. Its documentation describes its capabilities and bundled software; do not assume it has an infrared channel or accepts 120 film. Use its own film-carrier and software instructions, not V600 steps. Plustek 8100.
Camera scanning: A camera with a suitable macro lens, stable stand, even backlight and flat film carrier can digitize negatives. Alignment, reflections and consistency matter. Camera captures generally require a separate color-negative conversion step and lack scanner infrared dust correction. The Negative Lab Pro scanning guide is a practical vendor reference, not independently tested evidence from this website.
Smartphone kit: Use a purpose-made film holder and controlled illumination where possible. This is convenient for quick sharing but should not be presented as an equivalent archival method without measured results. Do not assume a phone screen is a color-accurate backlight.
Lab scans: A sensible option when you have few rolls or cannot invest in suitable scanning equipment. For context, see developing film at home. Ask what files you will receive, how much cropping/adjustment is included, and whether the lab returns your original negatives.
What this article does—and does not—establish
This guide synthesizes manufacturer manuals and preservation references. It does not claim an Epson V600 was personally used, an actual negative was scanned, the exact optical resolution was measured, or dust correction was tested. The worked steps reflect legacy Epson Scan documentation and may differ from current drivers. The overview image is conceptual rather than a real equipment photograph or scan result.
Reference index
- Epson — Placing Film or Slides
- Epson — Scanning in Professional Mode
- Epson — File Save Settings
- Epson — Digital ICE
- Epson — Dust Removal
- Epson — Scan Quality Problems
- Library of Congress — Care and Handling of Photographs
- VueScan — Scanning Slides and Negatives
- GIMP 3.0 — Levels